This chapter explains how the previously explained concept is applied to Wicket. It expects the reader to be familiar with Wicket core concepts and shows how they are extended and improved by this framework.
2.1) How does it influence the daily routine?
For starters, let us answer this important question. The following activity diagram shows how you go around to get your work done:
NoWicket Development Workflow
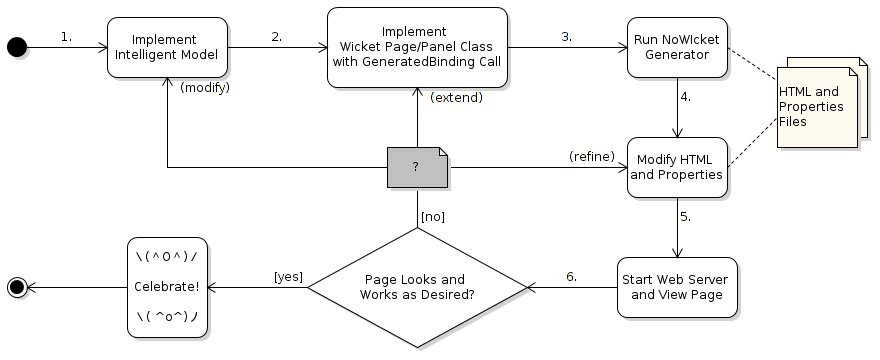
You might remember reading something similar to this in the introduction page, where we highlighted the benefits of the framework in your daily live. So instead of repeating ourselves, we will just extend that information and show how you go about it from a practical perspective.
Implement Intelligent Model
After you have defined what your view should look like and what behavior it is supposed to have, translate that concept into one or more
model classes that represent your ideas. The following tools are available here:
- Use property and action methods to define your user interactions. Everything public will be picked up by the generator, though you can use the @Hidden annotation to hide even public things. Missing setters for properties or null values will automatically result in disabled view components.
- The GuiService class allows you to display messages, show modals, do extended internationalization and do page redirects from anywhere without making your model code aware of any Wicket specific details.
- Add BeanValidation (JSR-303 and JSR-349) annotations to your property elements to keep your models clean from invalid user inputs. For more complex scenarios, write custom validators that intercept new values coming in from the UI and validate against other existing values from your model.
- Add utility methods for dynamic hide, disable, tooltip and titles to enhance your view logic. You can also access the Wicket RequestCycle, WebApplication and WebSession from anywhere. The Roles class allows you to check user permissions from anywhere.
- Throw checked exceptions with messages from your action elements to show the user default error dialogs. You can also secure actions via the @PreAuthorize annotation to allow them only for specific user roles and show also an error dialog on violation.
- Return other models from your action elements to cause a redirect there, or return null to prevent that.
- The default interaction scenario on the web is lazy form submission in order to save bandwidth and server load. To change this and make better use of AJAX, you can add the @Eager annotation where desired to give the user immediate feedback after he changes properties. The framework will automatically register onchange listeners for you and handle the page submit.
- It is useful to extend AValueObject in your models, since it offers a DirtyTracker with which it is easy to check for model changes and warn the user about data loss when redirecting without saving.
- Implement hashCode and equals methods for your model to control when the framework should reuse page instances after redirects or direct browser access.
- You can also write headless unit tests on those models using a mocked GuiService and the WicketTester (only for providing the Wicket context, not for actual rendering) to validate your model behavior.
Implement Wicket Page/Panel Class with GeneratedBinding Call
For each of your model classes, create a corresponding Wicket page or panel class that calls the
GeneratedBinding inside its constructor. This will process the HTML file using the
Visitor Pattern, find all Wicket IDs, match them against the model elements and instantiate components for them while creating a dynamic component tree according to the markup hierarchy. Despite this automated binding, you normally don't have to do much more on the Wicket side of things. But if you need to after all, you can extend this by the following means:
- Register a BindingInterceptor with which you can substitute default components by specific Wicket IDs. When you have added more Wicket IDs to the HTML than represented in the model class, you can bind them using this mechanism too. Otherwise Wicket would complain about missing components at runtime. All component classes follow the convention used by Wicket to be designed for extension and thus allow you to change everything about them.
- You can even register default BindingInterceptors for your whole web application in the GeneratedBindingDefaults class. There you can also change the error handling for action elements which normally shows a message box on checked exceptions.
- Make use of the various registries for HTML components, model elements and so on to get your metadata and generic binding for the model, or just use the model object directly and hard code the binding. You can access the dynamic model state (enabled, hidden, tooltips, titles) from the elements those registries contain and call getters/setter in a nullsafe fashion.
- Do anything you are used to from Wicket, like inheriting from a base page, handling page parameters, doing crazy component hierarchy manipulation, adding behaviors, dynamically modify HTML tags or CSS classes.
- Use I18nModel to reference internationalization properties dynamically, or do the normal Wicket internationalization things.
- Use the @MountPath annotation to beautify the bookmarked URL or use @AuthorizeInstantiation to secure the page for specific user roles.
- Register new pages in your website navigation menu inside the base page you created, which should extend AWebPage. You can also change the page format from container to container-fluid there, add tracking code to your pages, provide a locale switcher, modify the themes or change the AJAX busy indicator (AjaxIndicatorAppender) instance used.
- Change page processing settings in the web application using a WebApplicationInitializer override in your IWebApplicationConfig. You can also customize the session, the favicon, home page, authentication manager, error pages and sign in/sign out pages in the config class. Override the BootstrapExtensionsHeaderContributor to remove features like autofocus, enter keyboard binding, allowing copy/paste on disabled inputs, disabling components during AJAX calls and retrying AJAX calls on connection loss with Offline.js (useful for mobile connections).
- We separated the IWebApplicationConfig from the WebApplication itself to allow reuse of web.xml configurations, which need to have a fixed path to your WebApplication class. This eases configuration in a multi module project structure and allows you to replace the config class dynamically using a dependency injection context if desired.
Run NoWicket Generator
Run the main or test class you have setup for the generator. It processes your model classes using the
Visitor Pattern and generates the HTML and properties files for them. If those files already exist, the generator will merge new things into those files at the end without touching the things you edited. The generator will never remove things from the output files, if you refactor your model, you might have to refactor your HTML Wicket IDs as well or remove old things to regenerate them. You can use the following variations of the generator:
- SpecifiedGeneratedMarkup: Use this class to define manually what model classes to process from where and provide the destination folder for the generated files.
- SpecifiedGeneratedMarkupMain: A command line wrapper around the SpecifiedGeneratedMarkup so you can integrate it with your build tools.
- AAnnotatedGeneratedMarkup: Extend this one for the most convenient way to generate markup. The generator will scan your given base packages and process all model classes annotated with @GeneratedMarkup. This generator will delegate the work to SpecifiedGeneratedMarkup after collecting all information.
Modify HTML and Properties
Edit the generated files:
- Adjust the order of components and put everything where it belongs in the bootstrap grid layout. You can also use WYSIWYG tools, just add a reference to the bootstrap CSS in the file header if desired. Or remove all bootstrap tags and go back to the table layout if desired.
- Modify tags to change the components that should appear in the website. The GeneratedBinding will adjust itself automatically as needed and as logically possible.
- Add the btn-primary CSS class to the button you want to get a keyboard binding on the enter button.
- Put the autofocus attribute to an input to change the default autofocus behavior. Add it to a hidden input to disable autofocus.
- Remove unneeded tags or add your own Wicket IDs that you want to bind manually using a BindingInterceptor.
- Internationalize the markup by adding wicket:message tags and enhance the properties file as you need. Duplicate the properties file for other locales. You could also add more property elements to your model class for internationalization purposes.
- Uncomment the feedback tag to get one place for validation messages. Remove the gridcolumn tags around your inputs to prevent validation messages from appearing inline.
Start Web Server and View Page
To verify that your page renders properly and that it behaves as expected, there is no way around manually checking it in the browser. Start an
embedded web server with Jetty or Tomcat, integrate them via their
maven plugins or deploy your application to a test server.
- You could also use JRebel or at least use the hot code replacement in the debug mode of your IDE to reduce the amount of restarts you need while working on the web application. Also use the development config of Wicket to reduce the amount of caching done. If the page cache hinders you, reset your session cookie to get a new session without restarting the application. This can be done either by deleting cookies in your browser, or by signing out and signing in again in the application.
- With a Wicket deployment config the website will automatically minify the HTML, CSS and JavaScript resources and do lots of other performance optimizations.
- The application also handles web crawlers Search Engine Optimization (SEO) friendly by reverting to one pass rendering for agents that are identified as bots to prevent redirect confusion in them.
Page Looks and Works as Desired?
Now it is time to try out the website and get a feel for it.
- Do your usability checks. Verify that buttons, modals, validations, behaviors, AJAX and status messages work as expected. Check if you are missing some of the requirements or did not implement them correctly.
- Test different browsers to see that bootstrap and modernizr do a good job at abstracting away inconsistencies. Verify that the layout is responsive on smaller screens.
- Try to disable JavaScript in your browser to see if the common Wicket AJAX fallback functionality works. Where possible, the framework automatically binds AJAX components that have fallbacks, though not everything works this way. Things that won't work are CSS based icons, dropdown buttons and modals since they are dependant on JavaScript. But things like button clicks and basic navigation will still work, which should be enough for most bots to index your website properly.
- If you find something odd, just go back a few steps to modify/extend/refine the appropriate files, rerun the generator if needed and check again. Sometimes this is just a matter of trial and error in a feedback loop. As soon as you are satisfied, go grab a beer with some friends and tell them how satisfying working with Wicket can be.
2.2) Does it change Wickets internal processing?
Not at all! Wicket still behaves as usual and all artifacts you are used to are still present in your project. Wickets internal processing is demonstrated by the following graphic:
Wickets Internal Processing
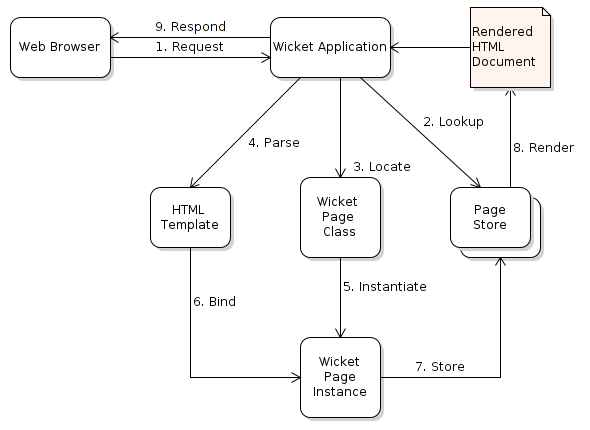
We will explain next at which steps the NoWicket framework is active during Wickets internal processing:
- Request:
As usual the web browser asks the Wicket application to retrieve a page. The Wicket application was setup using the NoWicket AWebApplication base class and is thus configured according to your IWebApplicationConfig. If no session is present yet, it creates a new one for the client.
- Lookup:
Then Wicket checks its page store, if it finds a page, it returns it directly. The addition here is that AWebApplication adds its own model aware session page cache on top of the page store. So if a bookmarkable URL was requested for which a new model was created, but that created model matches in equality to a model from a previous page in the page store, then that previous page instance is served instead of returning a new page. The user will still see his UI state as it previously was. So for example sorting information in a data table will be the same as previously, data paging will still be on the old page and validation messages will still be there. This transforms dumb links (ones without the ?{ID} parameter) into page store aware links.
- Locate:
If the page store was empty, Wicket locates the appropriate page class to be served.
- Parse:
Then it parses the requested HTML template and sees what Wicket IDs need to be provided as components by the page class.
- Instantiate:
And instantiates the page class to combine both. If the page was requested from a bookmarkable link, then the page constructor without a model argument will be used, where you will be responsible to create a new model instance. Otherwise if this was an internal redirect based on a model, then the page will be instantiated with a model constructor where you will be responsible to use it since it might be specially configured from the redirecting code. Remember from above that action elements in models and code using the GuiService can do model based redirects.
- Bind:
The page instance will then build its component hierarchy corresponding to the HTML template and bind values from the model into the HTML placeholders. Here the GeneratedBinding takes place if you put it into the constructor (otherwise you do it the classic Wicket way). The binding might add other panels into the hierarchy which also have their corresponding markup and initializations with a separate GeneratedBinding taking place. In each case separate BindingInterceptors and component modifications might be used.
- Store:
When everything between the HTML and the model is wired up, Wicket will put the new page instance into the page store for future lookups.
- Render:
Then it will render the HTML document and put in the values from the model that were wired.
- Respond:
And finally it answers the browser with the content requested.
